

i’ve started printing in petg with pla supports since the support surface finish is so good, but whenever i print round things with tree supports i see what looks like layer shifts. since my printer is a corexy toolchanger and not a bedslinger this behaviour has confounded me until today, when i happened to look at the right time. it seems that the layers of the perimeter are not adhering properly, and as the filament cools it contracts, catches on support material, and pulls the entire ring off of the pla supports. meanwhile on the middle part i see no issues at all.
i don’t even know what to call this problem. it’s not stringing, it’s already extruded plastic that does it. layer adhesion issues maybe? the photo up top is a reconstruction of how this print looked on the bed, since it fell apart the moment i flexed the buildplate.
printer settings
printer: Snapmaker u1, 0.4mm hacdened steel nozzles filament: eSun PETG Basic black, Snapspeed PLA yellow
print settings: snapmaker orca “optimal” preset with some minor changes (0.16mm layer height, 15% grid infill (meant to change that), automatic tree supports on build plate only, 2 layer raft, and support interface ironing enabled)
petg settings: orcaslicer’s “generic petg” preset with some minor modifications (12mm² max volumetric speed, 265°C nozzle temperature, 10mm retraction, pressure advance disabsed to use the calibration value from the machine)
here’s a look at the underside of the pieces:

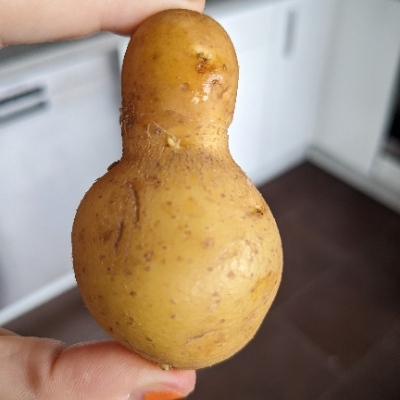
and a closeup of the round part:

as far as i can tell, that’s pretty much perfect before it falls apart.
i can still print with the “normal” supports because they come up the sides of the circle, but it feels like a waste of filament. any ideas?
Any updates? I’m having the problem again and now my heads aren’t parking/picked up about 1 in every 100 times (layers).
I just tried re-adjusting the belt tension. Again. It seems to be an issue with the U1.
i determined that slowing down and decreasing cooling is the most promising path forward but i found an issue with the model so i’ve been spending the past days in cad. belt tension has not been an issue for me, i followed the set-up instructions for tensioning and it has held. i’ve only had one pick-up failure in 345 print hours and 8000ish head changes.
What’s your fan speed? Those lines crossing have very little sag, which may imply a lot of part cooling. PETG likes it hot.
I usually keep it below 30%
now that’s a good note. orca doesn’t seem to have one setting for that, it has a span to work within depending on how long a layer takes to print:

this is how it’s set up by default on the “generic PETG” profile. compared to they have it set up for their own “Snapmaker PETG HF” profile the fan speeds are definitely higher.

maybe i’ll try running those numbers instead.
I mean, like you know PETG doesn’t bond at all to PLA, so you’re almost trying to extrude PETG in a circle mid-air. There’s so little friction/adhesion to PLA that the nozzle simply drags the extruded PETG along with it, it’s like trying to extrude first layer but with Z-offset set way too high so the extrusion barely squishes against the plate.
My best guess is to try and turn the speed way down and see if it will help…like <50mm/s
Also you could try classic supports. They have more surface area.
well it does bind, just not hard. the surface area of the central piece is enough to make it stick pretty well. it’s just these thin parts that are giving me trouble. but yeah, slowing down probably helps.
I would think the perimeter would have a lot of leverage on the center. I have a Snapmaker on the way but haven’t printed with different materials yet. There’s like 50 trees around the perimeter. Is it possible to make, say, 2 or 4 of the trees in PETG? Maybe that would be enough to keep it anchored.
i was thinking something along those lines too, but i’d have to build them into the model. petg is a bitch to clean off of the pei plate.
Considering cheap and bad fillament, nozel speed, heat and cooling
I’ve had similar challenges doing the same.
Two of the recommendations below helped a lot: 0 the z gap for supports and switch away from organic to get more surface contact.
I still had some challenges even after these changes helped a lot - just enough pla in the nozzle mixed with Petg left the resulting model very fragile, so for anyone using an MMU you may consider increasing the amount of Petg extruded between filament changes.
Good luck, and enjoy the challenge!
OP says they have a tool changer, so filament mixing isn’t an issue.
This is how it looks when my layers didn’t bond.
I’ve never tried this, but if what people say in this thread about how PETG doesn’t bond well to PLA,
Then you’ll definitely need to adjust your Z-Interface distance between support and bottom layers. The default is likely too much of a distance.
I don’t know what your slicer setting is called, but in PrusaSlicer its called “Top Contact Z Distance” in the support settings, and when it comes to PLA vs PLA, it has an extra 0.17mm distance added.
If I were you, I would try 0.05 or even none.
that sounds worth trying! does it affect the surface finish?
Definitely go 0mm when using PLA as support for PETG, it makes a much better bottom surface on the model because they don’t bond.
I went through the exact problem 2 days ago on my U1.
I was trying to print a very thick cylinder, with pctg directly on the bed (no pla support). Extremely simple and it kept failing. Glue stick and upping the bed temp didn’t seem to help. I also slowed acceleration. Oddly fewer wall loops helped so it made me think it was warping. I tried z hop and finally got it printing but it could have been a combo of doing the previous steps too.
It could also be a bed leveling problem. The mesh is only for head 1 and I was printing with head 4. Bed mesh is possible because I first tried printing 4 at once and 1 was good, 2 had a severe layer line but finished, and one failed. I then couldn’t re print that last one and kept having the failures where I tried everything above.
that levelling tidbit is interesting. good to know.
Try slowing down the speed more.
Petg ooze a lot. I don’t know if that’s a high flow nozzle, if so could contribute to the oozage.
265C is cooking the PETG. I never go above 230C.
230 is on the low range for PETG, the reason many manufacturers recommend it is because of people with PTFE-lined hotends who don’t want cancer. 250 is what I tend to do. As always, do what works for you!
265°C is reasonable for a fast CoreXY printer.
the datasheet for this one recommends 255, which is also within range of the preset in orcaslicer. common wisdom on the web seems to be to go above the specified temps for petg, rather than below, with some people recommending 280 degrees.
Invalid slice maybe? Did you inspect the gcode you sent to the printer using Zupfe or similar?